


6 DIY Montessori Toys You Can Make for Every Development Stage
Have you been seeing Montessori toys all over social media lately? They look great—but the price tag? Not so much. While many parents associate Montessori with expensive wooden baby toys, everyday household items can provide the same learning opportunities. A shoebox, a few buttons, some old fabric scraps: that’s really all you need.
This guide shows you how to turn everyday household items into simple, battery-free learning tools that support your child’s development at every stage.
What Makes a Toy Montessori?
Not every toy with the Montessori label actually follows its philosophy. According to the American Montessori Society (AMS), the method relies on hands-on materials that let your child figure things out independently, repeat actions at their own pace, and learn through direct discovery. Think of it as the opposite of a battery-powered toy that lights up and does everything for your child.
Truth? Expensive wooden sets aren’t required to give your child that kind of experience. According to a 2019 report from the American Academy of Pediatrics (AAP), the most beneficial toys are simple, physical items that encourage you and your child to play together—and there’s no scientific evidence that electronic toys offer the same developmental benefits. In fact, toys with flashing lights and loud noises can actually decrease your child’s social engagement and reduce the number of words spoken during playtime.
So go ahead and grab that plastic tub (cleaned, of course) because it works just as well, sometimes even better. It keeps the focus on the learning itself, not the toy. The best Montessori educational toys encourage your child to learn by doing things—touching, sorting, figuring it out—instead of just watching something whir up. And the good news? You can put them together yourself.
Before you begin: Always watch your child as they play, especially with homemade toys that contain small parts. Check each toy regularly for loose pieces, sharp edges, or damage, and choose materials that are appropriate for your child’s age.
6 DIY Montessori Toys You Can Make Today
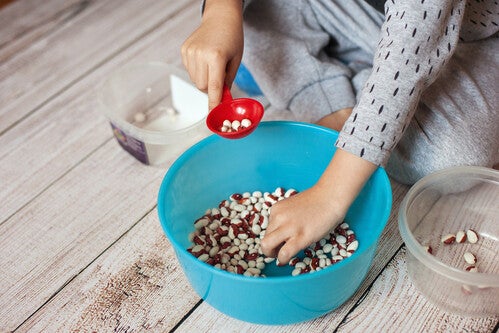
Open-ended toys made from everyday materials support independent play without the need for batteries or expensive sets.
You don’t need to run to a craft store for any of these suggestions. Check your kitchen, your recycling bin, and that drawer full of random stuff. Chances are, you’re already halfway there. Here are six DIY Montessori toys organized by age range, from youngest to oldest.
Remember, the suggested ages are only a guide. Every child develops at their own pace, so choose activities based on their interests, abilities, and readiness rather than age alone.
1. Sensory bottle shakers (6 to 12 months)
If you’re looking for Montessori infant toys, a homemade sensory bottle is one of the easiest places to start. Shaking, listening, and repeating simple movements help your baby learn cause and effect, and a sensory bottle gives them a safe way to explore both.
According to the 2022 developmental milestones from the AAP and Centers for Disease Control and Prevention (CDC), reaching to grab a toy is an expected motor skill at 6 months. By 9 months, babies typically start banging objects together. This bottle gives your little one a safe, easy-to-hold object to practice those specific movements.
You’ll need: Clear plastic water bottle, dried beans or rice, strong glue
How to make it:
- Fill the bottle halfway with dried beans or rice.
- Apply strong glue to the cap threads.
- Seal tightly and let it dry completely before giving it to your baby.
Try this next: Try adding food coloring, water, and a splash of baby oil for a slow-moving visual effect. Your baby will stare at it longer than you’d expect.
2. Plastic container coin drop (9 to 15 months)
Does your baby love playing peekaboo? Then they’ll enjoy a plastic container coin drop. This activity helps your little one understand that items still exist even when hidden from view. By 9 months, babies start looking for objects that drop out of sight. Around 12 months, putting something inside a container becomes an expected milestone. This action lets your child build both skills while strengthening their finger grip.
You’ll need: Clean plastic food tub, large buttons, or jar lids
How to make it:
- Clean and dry the plastic tub.
- Cut a slit in the lid just wide enough for the buttons to slide through.
- Demonstrate dropping the button through the slot and let your child repeat it.
Try this next: As your baby gets the hang of it, cut a smaller slit or swap in bigger buttons to challenge them even more.
3. Tissue box fabric pull (8 to 14 months)
Watch your baby pull one fabric scrap after another and you’ll see the learning happen in real time—grasping, transferring, tugging. By 9 months, most babies can move things from one hand to the other. By 12 months, they start to pick things up between their thumb and pointer finger. This makes the tissue box pull one of the most practical Montessori toys for 1-year-olds since it lets them strengthen those exact grips to pull and tug the fabric.
You’ll need: Empty tissue box, old clean scarves or fabric scraps
How to make it:
- Tie the fabric scraps together end-to-end into one long chain.
- Stuff the chain inside the empty tissue box.
- Leave one end poking out for your child to grab and pull.
Try this next: Mix in different textures—silk, cotton, wool—and watch your baby slow down on the ones that feel interesting.
4. Empty shoebox shape sorter (12 to 18 months)
Once your toddler begins matching and sorting objects, a homemade shape sorter becomes an easy way to build hand-eye coordination and problem-solving skills. Around 15 months, they usually start stacking objects and figuring out how to use things the right way. This activity helps them match shapes and drop them into the correct spaces. It’s one of the easiest Montessori toys for toddlers to create at home.
You’ll need: Shoebox, scissors, basic wooden or plastic blocks
How to make it:
- Trace each block shape onto the shoebox lid.
- Cut holes that match the block shapes.
- Show your child how to drop each block through the matching hole.
Try this next: Color the edges of each hole to match the blocks. It adds a color-matching layer that your child will figure out faster than you think.
5. DIY sensory bin with dried rice (18 to 36 months)
If your toddler can’t keep their hands out of things, a sensory bin is made for them. Scooping, pouring, and digging through rice or beans builds the kind of focus and fine motor skills that develop between 18 and 24 months, when they typically begin using spoons and coordinating both hands. That’s why sensory bins are some of the best Montessori toys for 2-year-olds: they turn your toddler’s natural impulse into a learning moment.
You’ll need: Shallow plastic bin, dried rice or beans, small cups or spoons
How to make it:
- Pour dried rice or beans into the shallow bin.
- Add small cups, spoons, and a funnel.
- Show your child how to scoop and pour, then let them explore freely.
Try this next: Hide a few small toy animals in the rice. Your toddler will dig through the whole bin just to find them—and then ask you to hide them again.
6. Clothespin color match (30 to 48 months)
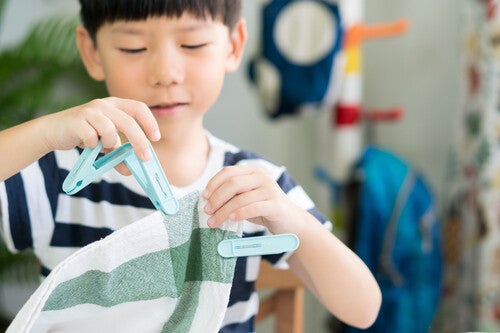
Clipping colored clothespins to a cardboard circle or a colored cloth helps with color recognition and finger strength.
If your toddler is starting to notice colors, this one’s for them. By around 30 months, most kids can point to at least one color when asked. At 4 years old, they can name a few colors of things around them. Clipping clothespins onto matching colors gives them a hands-on way to practice both—while sneaking in some fine motor skills at the same time.
You’ll need: Clothespins, markers, cardboard circle
How to make it:
- Divide the cardboard circle into colored sections using markers.
- Color the tips of the clothespins to match each section.
- Guide your child to clip each clothespin onto its matching color.
Try this next: Write numbers on the clothespins to turn it into a counting game—an easy introduction to Montessori math toys for toddlers, without feeling like a lesson.
A Quick Note on Safety
DIY toys are simple to make, but a few safety habits go a long way, especially for babies and toddlers still exploring everything with their mouths. The American Academy of Pediatrics (AAP) reminds parents that toy safety starts with the basics: watching part sizes, supervising play, and keeping toys in good condition.
- Smooth out sharp edges. After cutting cardboard or shoebox lids, run your finger along every edge. If it feels sharp, cover it with tape before letting your child play.
- Watch the part sizes. Any loose piece—buttons, jar lids, dried beans—should be too large to fit in your child’s mouth to prevent choking.
- Always supervise play. Sit nearby, especially for children under three. Let them explore freely, but stay close enough to step in if needed.
- Check toys regularly. Look for cracks, loose parts, or worn edges before each play session. If something’s broken or fraying, set it aside and make a new one—these toys are easy to replace.
And don’t forget to keep toys clean. Wipe down plastic containers and bottles with a damp cloth after each use. Toss fabric scraps in the wash regularly. Clean, well-maintained toys are safer and last longer.
How to Introduce These Toys to Your Child
Making the toy is only half of it. How you set it up matters just as much—and it’s simpler than it sounds. Here are a few things to keep in mind:
- Limit the choices. Put out one or two toys at a time to prevent overwhelming your child and to help them understand expectations.
- Place toys within reach. Use open, low shelves or a basket on the floor at your child's eye level for easy access and tidying.
- Let them lead. Once you demonstrate how the toy works, step back. Allow your children to figure things out independently. If your child loses interest, don’t force the activity. Put it away and reintroduce it another day instead.
- Encourage repetition. Don’t worry if your child wants to repeat the same activity several times. Repetition is a key part of Montessori learning and helps build confidence, coordination, and mastery.
- Rotate regularly. Rotate extra toys every week or two to maintain interest and keep the space neat without buying anything new.
Build, Play, Learn
The best Montessori toys don’t have to come with a high price tag. With a few recycled household items, you can create learning tools that encourage curiosity, independence, and hands-on discovery. Start with one activity, observe what interests your child, and build from there. Try making just one toy from this list today. Watch how your child interacts with it, and rotate it out when they’re ready for a new challenge.
You don’t need to spend a lot on baby toys in the Philippines when you can make them yourself. Connect with other parents in the ParenTeam Moms and Dads Facebook group and share your ideas for DIY Montessori toys.
References
Montessori Method. "Montessori Toys." Accessed June 26, 2026. https://montessorimethod.com/toys/
Montessori Northwest. "Montessori Education." Accessed June 26, 2026. https://montessori-nw.org/about-montessori-education
Whitby School. "12 Montessori Toys to Help Your Child Learn Through Play." Passion for Learning (blog). May 4, 2016. Accessed June 26, 2026. https://www.whitbyschool.org/passionforlearning/12-montessori-toys-to-help-your-child-learn-through-play
Wood and Hearts. "30 DIY Montessori Toys Ideas from Everyday Household Items." Accessed June 26, 2026. https://woodandhearts.com/blogs/news/diy-montessori-toys
Related articles

15 Filipino Parenting Myths: What to Keep or Let Go, According to Stage
Cravings and pwera usog? Filipino myths are part and parcel of parenting. Here’s what’s sentimental, what’s outdated, and what modern medicine actually says.
14 mins to read

Baptism and Christening Costs in the Philippines: What to Expect
Baptism and christening costs in the Philippines add up fast. See where the money goes, and where you can spend less without losing the meaning.
8 mins to read

15 Time-Saving Mother's Day Gift Ideas New and Toddler Moms
These useful gifts for new moms will make them feel supported, loved, and more like themselves again.
6 mins to read

Hooked on K-Dramas? 9 Korean Boy Names Inspired by Beloved Characters
These Korean boy names from popular K-dramas are perfect for your little one. Find a name with a beautiful meaning and strong character traits today.
9 mins to read

How to Choose Unique Girl Names That Are Meaningful and Special
Looking for unique girl names? Skip the usual top-10 lists and use these creative strategies to choose a meaningful, one-of-a-kind name for your daughter.
7 mins to read

15 Strong Baby Boy Names with Meaning for Your Little One
Explore baby boy names with meaning that fit your family’s style. Discover Tagalog names, Spanish-Christian picks, and modern choices that are meaningful and timeless.
6 mins to read

15 Work-Life Balance Hacks Every Mom Needs in Her Life Right Now
Time to build your version of work-life balance! Use these tips to learn what to let go and how to reclaim time for yourself without the guilt.
6 mins to read

Christening or Baptism: When to Schedule and What to Prepare
Your baby's christening or baptism marks a beautiful milestone for your family! Here's everything you need to know to plan for this important religious ceremony.
7 mins to read

10 '90s-Themed Birthday Party Ideas for Your 1-Year-Old
This '90s birthday party guide gives you 10 themes for a fun toddler party, from cartoon vibes to sensory play.
7 mins to read

New Mom? Here’s a Self-Care Plan for Your First Month
This self-care plan helps you manage your first month as a new mom. Learn how to handle sleep, healing, and home life with your little one.
7 mins to read

When and How to Get a PSA Birth Certificate for Your Baby
Knowing how to get a PSA birth certificate and when it becomes available can save you from unnecessary trips and delays.
6 mins to read

10 Ways Working Moms Can Simplify Life After Having a Baby
The early months after maternity leave are usually the hardest for a working mom. Here are a few practical tips to make the transition smoother.
6 mins to read

How to Create a Healthy Environment at Home for Your Newborn
Building a healthy environment at home helps your newborn thrive. Discover simple, affordable ways to keep your space safe, clean, and comfortable for your little one.
6 mins to read

The Joy of Parenting: 5 Tips for Spending Quality Time with Your Baby
Spending quality time with your little one doesn’t require a vacation. Discover five simple ways to pause your chores, connect deeply, and find joy every single day.
5 mins to read

Trending or Timeless? 20 Common Filipino Names from PSA Records
We looked at all the available PSA top 10 lists to come up with the common Filipino names over time. And guess what? You won't see any creative spellings!
5 mins to read

Traveling with a Baby in the Philippines: Packing, Safety, and Prep Guide
Traveling with a baby doesn’t have to feel overwhelming. Get a packing checklist plus car, ferry, and flight prep made for Filipino families.
8 mins to read

Do You Need a Pacifier for Your Baby? What to Know Before Deciding
Here’s what a pediatrician wants you to know about using a pacifier.
9 mins to read

Iba ang Pambata: Why Age-Appropriate Milk Matters
You wouldn’t let your youngest child wear ate or kuya’s shoes—so why give them milk that isn’t made for their age? Milk is not one-size-fits-all.
5 mins to read

Wais Pag Sakto sa Edad: Why Age-Appropriate Milk Matters
Milk comes in many forms, but not all milk is made equal. Learn why kids need age-appropriate nutrition during their most critical years of growth.
6 mins to read


