


Getting a proper baby picture for a visa or passport sounds simple—until you're on your third attempt and your little one keeps closing their eyes. Government photo requirements are strict: plain white background, eyes open, neutral expression, and no hands or accessories in the frame. Infants rarely stay still long enough for a photo.
While the DFA captures passport photos on-site, you still need to submit printed photos for foreign visa applications, dual citizenship processing, and other infant travel documents. This guide walks you through the setup, timing, and technique to get your baby’s picture at home without a professional photographer.
1. Know the Official Requirements First
Government agencies reject photos that fail to meet their exact specifications. Review the official guidelines before you set up your camera to ensure your baby’s photo is accepted.
Check the background and face rules.
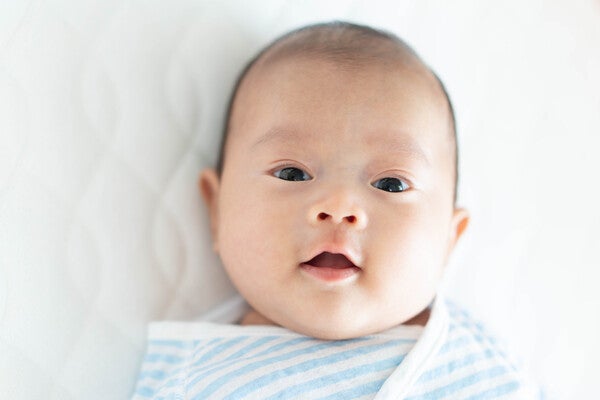
Most foreign visa applications require a plain white or off-white background. Your baby's face must be centered with a neutral expression. Smiling isn't often acceptable for official ID photos, even for infants. It's safest to aim for fully open eyes, but some offices are lenient with newborns.
The U.S. Department of State explicitly allows an infant's eyes to be partially open or not entirely open for visa and passport photos. All older children must have their eyes fully open.
Review the photo size requirements.
Confirm the required size with the specific issuing office before you print. Visa photo sizes vary depending on your destination:
- United States: 2 x 2 inches (51 x 51 mm)
- Canada: 50 mm x 70 mm
- Schengen Area: 35 mm x 45 mm
- South Korea: 35 mm x 45 mm
- Japan: 45 mm x 45 mm
Keep hats and other people out of the frame.
Government agencies reject baby photos showing extra objects. It's common to accidentally get your fingers in the frame when trying to hold a wiggling infant, but your hands shouldn’t be visible in the final crop. You also need to remove hats, thick headbands, large bows, and pacifiers before taking the shot.
Dress your baby in solid, darker-colored clothing that contrasts with the white background. Avoid white outfits that blend into the backdrop, as well as busy prints or large patterns that can distract from the face.
2. Set Up Your Background and Lighting
Setting up a plain white blanket or bedsheet near a window gives you the best lighting for your baby’s picture.
Once you know the rules, it’s time to prepare your setup. Creating the right environment helps you get a clear infant photo without needing professional equipment.
Lay down a plain white sheet or blanket.
Laying your infant on a white sheet supports their head and provides the required plain backdrop. Stand directly overhead to avoid casting shadows on their face. If your baby struggles to lie flat, you can cover a car seat with a white sheet instead. The seat can help keep your baby comfortably positioned. Just remember to pull the fabric tight so wrinkles don't create unwanted shadows.
Find a spot with bright, natural light.
Set up near a window with indirect light. Overcast days are ideal because the clouds act as a natural diffuser, eliminating harsh shadows on your baby's face. Avoid setting up directly under a ceiling light or in a corner where shadows fall unevenly across the face.
Skip the camera flash.
Flash causes red-eye and might even startle your baby into crying or closing their eyes. Stick to natural or ambient light. If you're indoors with low light, open multiple windows or move to your brightest room rather than switching on the flash.
3. Time the Photo Session Around Your Baby
Even with the perfect lighting, a hungry or tired infant will struggle to stay still. Scheduling your session around your baby's daily routine gives you the best chance for a successful shot.
Take the photo right after feeding.
The sweet spot for your baby’s at-home photo session is often 20 to 30 minutes after your baby wakes up and feeds. At that point, they're alert but not yet cranky or overstimulated.
If you’re heading out to the DFA, choose a time when your baby is alert and happy. Avoid shooting when your baby is hungry, tired, or has been awake too long.
Ask another person for help.
Have your partner, a sibling, or another family member stand nearby to attract your baby's attention. One person can handle the camera while the other uses a toy or sound to keep your baby looking forward. This makes a bigger difference than most parents expect.
If your baby won’t cooperate, take breaks.
Don’t force the session if your little one becomes fussy or overstimulated. Try again after a short break, feeding, or diaper change. Some parents also find that gentle white noise or soft singing can help babies settle before the photo. It’s typical to spread the session across multiple attempts.
4. Position Your Baby Safely for the Shot
After choosing the right time, you need to place your infant in a safe, steady position that keeps them supported and still for the photo.
Place infants flat on their back.
This position is one of the easiest ways to capture a compliant infant picture when your baby can’t sit upright independently. Placing your baby flat on your sheet and shooting from directly above prevents hands or arms from entering the frame. Use a step stool to shoot straight down so the camera lens is parallel to the baby's face.
Understanding your little one’s development stage gives helpful context on what your baby can and can't do at different stages, helping you know how to position your baby during the photo session.
Use rolled towels for head support.
Place small, rolled towels beneath the sheet on either side of your baby’s head to help keep it centered. This prevents head tilting without anyone's hands entering the frame. Make sure the towels don't create visible bumps or alter the flat appearance of the background.
Hold a high-contrast toy to direct their gaze.

Move a colorful toy near your lens. High-intensity contrast and motion capture your baby's focus.
Hold a brightly colored toy, like a bold red object, just behind and above your camera lens to help your baby look straight ahead. A 2022 review in Child Development Perspectives notes that a newborn's color vision is limited, so they best detect objects that are highly saturated and red.
Another recent study in Infant Behavior & Development confirms that a young infant's attention is highly determined by high-intensity contrast and movement. Keep the toy moving slightly to keep them focused,and take the shot the moment they lock eyes on the lens.
5. Adjust Your Camera and Phone Settings
With your infant safely positioned, your device settings determine the final image quality. Choosing the right camera modes helps you capture a sharp photo even if they move their arms or legs.
Use portrait mode or a fast shutter speed.
Even a slight movement from your baby can blur the image. Use your phone's portrait mode or, if you're on a DSLR, set a fast shutter speed (1/200s or higher) to freeze motion. Keep the ISO low to avoid grain in the final photo.
Take multiple shots using burst mode.
Don't rely on a single shot. Set your phone or camera to burst mode and take multiple photos in one go. You’ll have a better chance of capturing a clear moment with your baby looking forward with a relaxed expression. Review them after the session and pick the best one.
6. Edit and Submit Your Baby’s Picture
Capturing the image is only part of the process. You’ll need to crop and review your final photo carefully to guarantee it meets the strict ID requirements before printing.
Watch out for shadows and cropping errors.
The most common rejection reasons are shadows on the face or background, eyes that are partially closed, a chin that's cut off, or a background with uneven lighting or discoloration. Review your shortlist of photos carefully before editing. Only move forward with a shot where the background and your baby's face are evenly lit.
Crop to the correct dimensions and adjust brightness only.
Use a passport photo app or editing tool to crop to the required size. Adjust brightness if the image looks slightly dark, but don't alter the skin tone or apply filters. Heavy editing can make the photo look manipulated, which is a rejection risk.
Some visa applications also require digital uploads, so save a high-resolution JPEG copy before printing. Double-check the file size and pixel requirements listed by the issuing office before submission.
Print on matte photo paper.
Print your final pick on matte photo paper, not regular bond paper. Government offices require photo-quality prints, and matte paper reduces glare that can distort the image during processing. Most photo printing shops can handle this, or you can use a home photo printer with the right paper.
Taking the Perfect Picture
Getting a compliant baby picture takes patience, but you can do it at home with the right lighting, timing, and positioning. If the first attempt doesn’t work, try again when your little one is rested and calm. A relaxed setup usually leads to the best shot.
Share your experience—or your own tricks— for taking your baby’s picture with other parents in the ParenTeam Moms and Dads Facebook group. Someone else's little one might thank you for it.
References
Chen, Zihe, Tingmin Yan, YuXin Cai, Tianjian Cui, and Shangbin Chen. 2023. "Using head-mounted eye trackers to explore children’s color preferences and perceptions of toys with different color gradients." Frontiers in Psychology 14: 1205213. Accessed on May 29, 2026. https://www.frontiersin.org/journals/psychology/articles/10.3389/fpsyg.2023.1205213/full
Grucela, Adam. 2025. "DIY Baby Photo." Passport-photo.online. Last modified March 4, 2025. Accessed on May 29, 2026. https://passport-photo.online/blog/diy-baby-photo
Mendez, Andres H., Chen Yu, and Linda B. Smith. 2024. "Controlling the input: How one-year-old infants sustain visual attention." Developmental Science 27 (2): e13445. Accessed on May 29, 2026. https://onlinelibrary.wiley.com/doi/10.1111/desc.13445
U.S. Department of State. n.d. "Photo Requirements." Accessed on May 29, 2026. https://travel.state.gov/content/travel/en/us-visas/visa-information-resources/photos.html Visafoto. n.d. "Baby Passport Photo Guidelines." Accessed on May 29, 2026. Visafoto.com
Related articles

10 Travel Essentials You’ll Actually Need When Flying with a Baby or Toddler
Turn your carry-on into the ultimate Mary Poppins bag. Bringing the right travel essentials can make family trips much more rewarding for everyone.
5 mins to read

5 Requirements for Your Child's Philippine Passport Application
Starting your child's Philippine passport application? This guide outlines all the necessary requirements, from documentation to photo tips for a stress-free process.
7 mins to read

How to Choose Unique Girl Names That Are Meaningful and Special
Looking for unique girl names? Skip the usual top-10 lists and use these creative strategies to choose a meaningful, one-of-a-kind name for your daughter.
7 mins to read

15 Time-Saving Mother's Day Gift Ideas New and Toddler Moms
These useful gifts for new moms will make them feel supported, loved, and more like themselves again.
6 mins to read

Bringing Your Premature Baby Home: A Doctor’s Practical Care Guide
Your premature baby needs special care at home. Discover how to create a safe space, stick to feeding plans, and manage your emotions with this guide.
9 mins to read

15 Strong Baby Boy Names with Meaning for Your Little One
Explore baby boy names with meaning that fit your family’s style. Discover Tagalog names, Spanish-Christian picks, and modern choices that are meaningful and timeless.
6 mins to read

How to Manage Postpartum Hair Loss: Expert Tips from a Dermatologist
Don't panic over postpartum hair loss! Learn why your hair is shedding and how to care for your delicate strands with these expert dermatologist tips.
7 mins to read

Bakit Umuungol Si Baby? Understanding Newborn Grunting Noises
Hearing newborn grunting can worry any parent. Find out why your little one makes these noises and learn exactly when you should call your pediatrician.
5 mins to read

15 Work-Life Balance Hacks Every Mom Needs in Her Life Right Now
Time to build your version of work-life balance! Use these tips to learn what to let go and how to reclaim time for yourself without the guilt.
6 mins to read

Newborn Essentials: A Real-Parent Guide for the First 90 Days
Overwhelmed by baby shopping? Check out this no-hype guide for Filipino parents that break down the true newborn essentials—plus which items to skip or splurge on.
7 mins to read

5 Key Baby Milestones and Health Terms to Know (Plus, a Fun Game!)
Understanding baby milestones gives you peace of mind as your little one grows. Explore five key health and development terms, and check your knowledge with a fun, stress-free game at the end!
5 mins to read

Newborn Baby Baths Made Simple
Master newborn baby bath time! Learn when and how often to bathe your baby, along with step-by-step techniques and safety advice for a happy baby!
5 mins to read

Babbling to Full Sentences! Your Language Development Checklist by Age
Learn the language development milestones your child needs to hit from baby to preschool stage.
7 mins to read

How to Make a Baby Sleep: 7 Parent-Tested Tips!
Wondering how to make a baby sleep? You're not alone. Here are the tips, tricks, and routines that real parents use to help their little ones sleep.
6 mins to read

How Much Do You Need to Save for Your Child’s College Tuition Fees
It's never too early to think and plan for college tuition fees, which increase yearly. Here's how much they cost now and how to calculate future costs.
5 mins to read

30 Must-Know Terms to Guide You Through the Early Childhood Stage
Welcome to your early childhood stage cheat sheet, so you feel more prepared and less frazzled for parenting!
11 mins to read

How to Prevent and Soothe a Diaper Rash
A diaper rash can make your baby fussy. Learn how to spot the different types, find the proper treatment, and keep your little one’s skin healthy.
7 mins to read

Christening or Baptism: When to Schedule and What to Prepare
Your baby's christening or baptism marks a beautiful milestone for your family! Here's everything you need to know to plan for this important religious ceremony.
7 mins to read

Heads Up, Parents: Immunization Schedule Now Includes Rabies Shots
Vaccines like MMR (measles, mumps, and rubella), polio, and hepatitis B remain. Learn more about the vaccines that play a crucial role in your child’s health.
7 mins to read